
실시간 스트리밍 서비스에 내채널 관리 페이지 부분을 맡았다.
채널 정보입력, 수정 기능이 필요했다.
다른 팀원분께서 대략적인 정보입력 로직을 만들어 놓으셔서
프론트 만들기 및 백과 연결, 그리고 사진 부분을 처리하게 되었다.
🦊 이미지 처리 과정
이미지는 왜 그냥 db에 저장하지 않을까?
파일의 크기가 너무 크기때문이다. 그래서 링크를 저장하고, 그 링크로 조회하는 방식으로 진행된다.
아래 그림을 보면 좀더 이해가 쉽다.
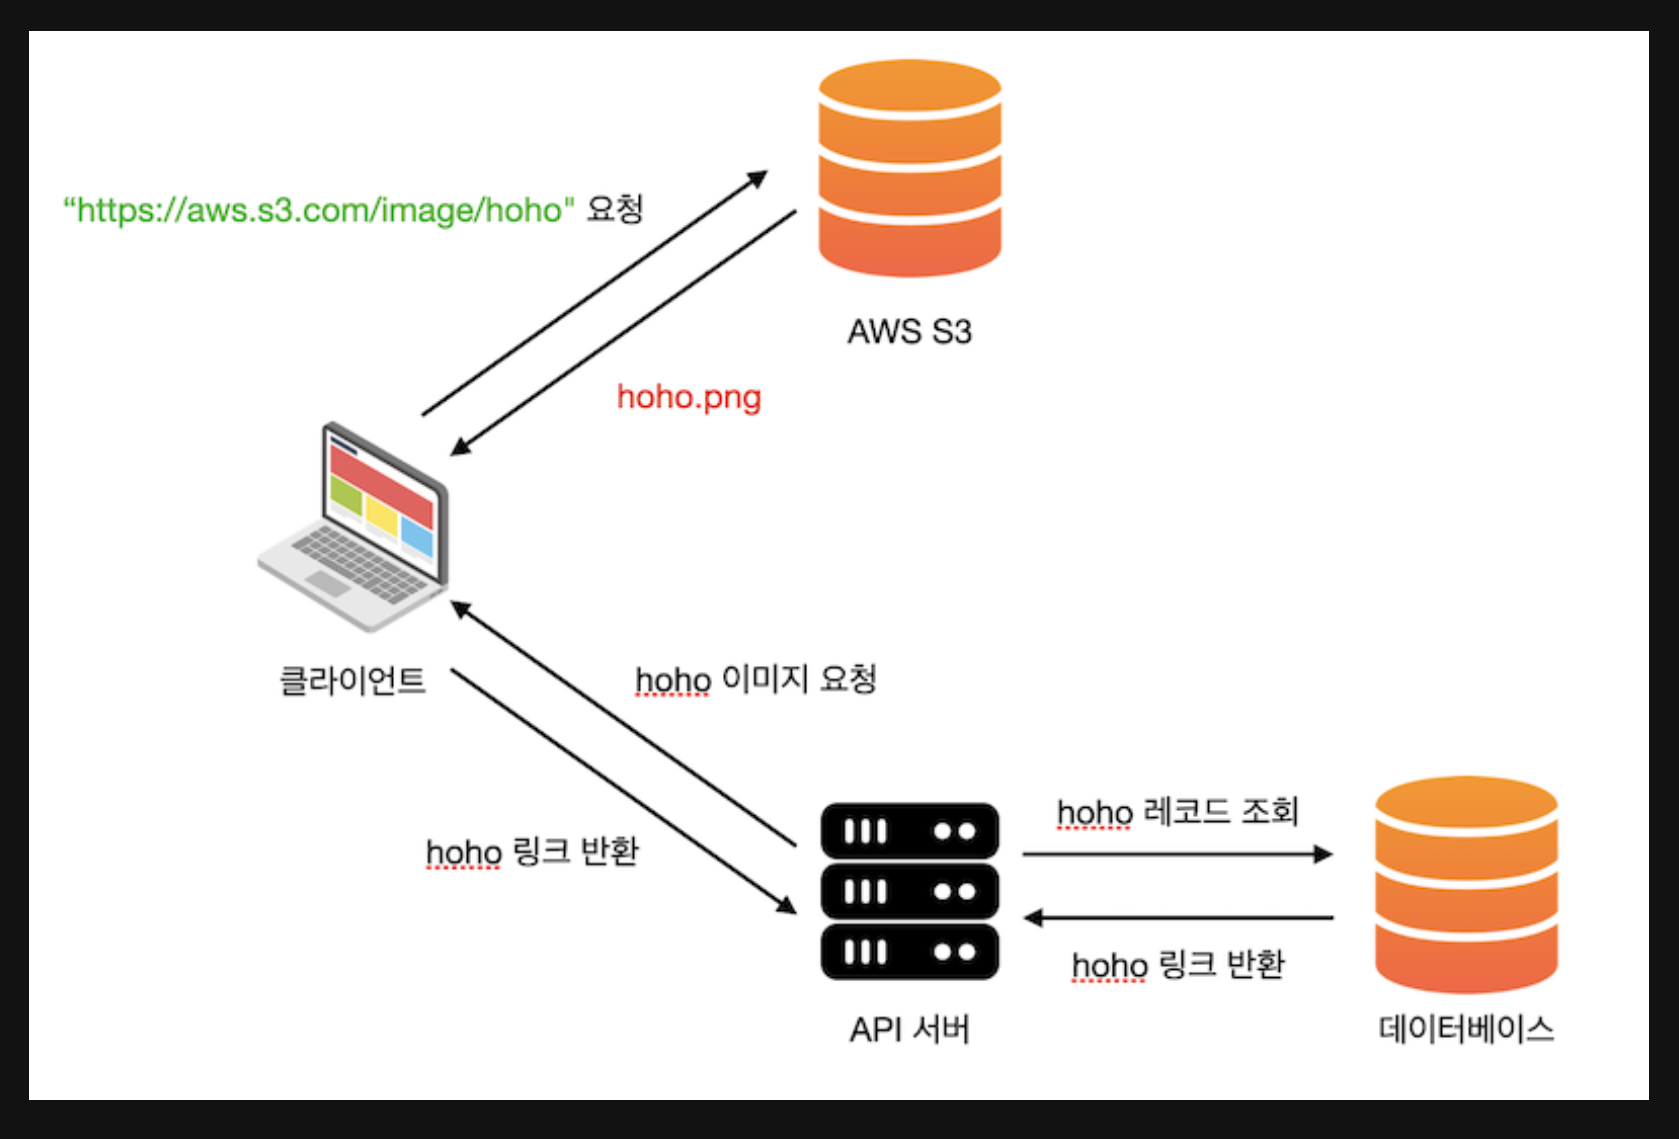
- 클라이언트는 서버로 이미지를 요청하면
- 서버는 db를 조회하고
- 조회결과로 링크를 받으면
- 클라이언트에게 이 링크를 주고
- 클라이언트는 이 링크로 이미지를 요청해서
- s3가 이미지를 클라이언트에게 내준다.
이제 nest js 에서 s3와 멀터를 이용해 이미지 업로드 하는 방법을 살펴보자.
🏞️ 이미지 업로드 하기
먼저 필요한 라이브러리들을 설치해 준다.
nestjs-form-data
@nestjs/platform-express
@aws-sdk/client-s3
@types/multer
그리고 s3저장소를 만든 다음, 중요한 access key와 같은 정보들을 적어둔다.
이후 나는 image를 따로 처리할 모듈을 만들었고, 이 모듈에서는 이미지만 처리하도록 구성하였다.
프론트에서 설정때문에 처음 애를 좀 먹었는데,
🚨 에러
Error: Multipart: Boundary not found
설정이 잘못된걸까 뭐가 잘못된걸까 아무리 찾아봐도 쉽게 해결되지 않았다.
공식문서와 다른 블로그들에 방법과 동일했기 때문에 이유를 알수 없었는데,
겨우 찾은 내용은 이렇다.
멀티파트(form-data) 요청을 처리할 때 일반적으로 발생합니다.
이 오류는 주로 클라이언트 측에서 `FormData` 객체를 사용하여 데이터를 전송할 때
서버 측에서 적절한 `boundary` 값을 찾지 못할 때 발생합니다.
따라서 아래 내용처럼 해당 부분을 지우면 작동한다고 해서 시도.
const formData = new FormData();
// formData에 데이터 추가

fetch('your-api-endpoint', {
  method: 'POST',
  body: formData,
  // headers: { 'Content-Type': 'multipart/form-data' } 이 부분을 제거하세요
});
다행이 제대로 작동하기 시작했다.
image.module 파일에서는 아래와 같이 간단하게 설정했고
import { Module } from '@nestjs/common';
import { ImageController } from './image.controller';
import { ImageService } from './image.service';
import { NestjsFormDataModule } from 'nestjs-form-data';

@Module({
    imports: [NestjsFormDataModule],
    controllers: [ImageController],
    providers: [ImageService],
})
export class ImageModule {}
image.controller파일에서 유의해야 했던 부분은
html 혹은 ejs파일에서 설정한 input 의 name값과 동일해야 한다고 한다.
<div class="input-group mb-3 channelInfoSettingInput" id="channelInfoSettingImage">
    <input type="file"  name="file"  class="form-control" id="inputGroupFile04" aria-describedby="inputGroupFileAddon04" aria-label="Upload">
    <button class="btn btn-outline-secondary" type="button" id="inputGroupFileAddon04">Upload</button>
</div>
아래는 image.controller.ts파일이다.
import { Body, Controller, HttpCode, Param, Post, Req, UploadedFile, UseGuards, UseInterceptors } from '@nestjs/common';
import { FileInterceptor } from '@nestjs/platform-express';
import { ImageService } from './image.service';
import { JwtAuthGuard } from 'src/auth/guards/jwt-auth.guard';
import { UserInfo } from 'src/common/decorator/user.decorator';
import { UserAfterAuth } from 'src/auth/interfaces/after-auth';

@Controller('api/setting')
export class ImageController {
    constructor(private readonly imageService: ImageService) {}

    @Post('/:channelId')
    @UseGuards(JwtAuthGuard)
    @UseInterceptors(FileInterceptor('file'))
    async saveImage(
        @Body() data,
        @UploadedFile() file: Express.Multer.File,
        @Param() channelId: number,
        @UserInfo() { id }: UserAfterAuth,
    ) {
        try {
            const exp = file.mimetype.slice(6);
            const fileName = `${id}_${channelId['channelId']}_채널이미지`;

            const saveImageToS3 = await this.imageService.saveImage(fileName, file, exp);
            if (saveImageToS3) {
                return {
                    success: true,
                    message: '성공적으로 채널 정보 이미지를 업데이트 했습니다.',
                    data: saveImageToS3,
                };
            } else {
                return {
                    success: false,
                    message: '채널 정보 이미지 업데이트에 실패 했습니다.',
                };
            }
        } catch (err) {
            console.log('err', err);
        }
    }
}
아래는 image.service.ts파일이다.
import { Injectable } from '@nestjs/common';
import { PutObjectCommand, S3Client } from '@aws-sdk/client-s3';
import { ConfigService } from '@nestjs/config';
import { S3 } from 'aws-sdk';

@Injectable()
export class ImageService {
    s3Client: S3Client;

    constructor(private configService: ConfigService) {
        //s3인스턴스 초기화.
        this.s3Client = new S3Client({
            region: this.configService.get('AWS_REGION'),
            credentials: {
                accessKeyId: this.configService.get('AWS_ACCESS_KEY'),
                secretAccessKey: this.configService.get('AWS_SECRET_ACCESS_KEY'),
            },
        });
    }

    async saveImage(
        fileName: string,
        file: Express.Multer.File, //파일 데이터 포함.
        ext: string, //파일확장자
    ) {
        const command = new PutObjectCommand({
            //PutObjectCommand는 s3객체 업로드 할때 사용.
            Bucket: this.configService.get('AWS_BUCKET_NAME'),
            Key: fileName,
            Body: file.buffer, //파일의 실제 데이터
            ACL: 'public-read',
            ContentType: `image/${ext}`,
        });

        await this.s3Client.send(command);
        return `https://s3.${process.env.AWS_REGION}.amazonaws.com/${process.env.AWS_BUCKET_NAME}/${fileName}`;
    }
}
설정은 따로 파일로 빼지 않고 constructor안에서 진행했고,
이미지만 저장하는 애를 따로 빼니 오히려 덜 헷갈리고 좋았다.
다만 이미지를 업로드 한 후 바로 적용이 되지 않는 현상이 있었는데,
이부분은 새로고침을 한번 더 실행하게 해줌으로서 일단 처리를 해놨다.
하지만 분명 트래픽 측면에서 봣을때 좋지 않은 동작임은 분명하다.
google , youtube의 경우 이미지를 변경했을때 바로 업로드 된 내용이 적용 되지 않고,
조금 시간이 지난 후에 적용되는 것을 확인할 수 있는데,
이부분을 참고해서 안내 메세지를 남기는 방법을 고려중에 있다.
참고한 사이트
https://docs.nestjs.com/techniques/file-upload
Documentation | NestJS - A progressive Node.js framework
Nest is a framework for building efficient, scalable Node.js server-side applications. It uses progressive JavaScript, is built with TypeScript and combines elements of OOP (Object Oriented Programming), FP (Functional Programming), and FRP (Functional Rea
docs.nestjs.com
https://velog.io/@bbaekddo/aws-s3
AWS S3 이미지 업로드 (with node.js)
S3 버켓 생성, 이미지 업로드
velog.io
'TIL' 카테고리의 다른 글
| 24/01/27 TIL __ 도커(1) (0) | 2024.01.27 |
|---|---|
| 24/01/26 TIL __ 실시간 채팅기능 연결 수정(스트리머, 유저) (0) | 2024.01.27 |
| 24/01/23 TIL __ 채팅기능 캐싱하기(redis) (0) | 2024.01.23 |
| 24/01/22 TIL __ 채팅기능에 금칙어 기능 추가 ( aho-corasick 라이브러리) (0) | 2024.01.22 |
| 24/01/21 TIL __ nestjs에서 socket io를 이용해 실시간 채팅기능 구현(mongodb) (0) | 2024.01.21 |